Thursday, November 30, 2017

Aluvision for SketchUp – The brand new sketchup extension is just launched

Aluvision for SketchUp is the newest extension available in extension warehouse. This sketchup extension can be applied with SketchUp 2015, SketchUp 2016, SketchUp 2017, SketchUp 2018.


The plugin is suitable for Architecture, Construction and Engineering sectors..
It can be used for smart snapping and detailed part list functionality with price.
To download readymade Aluvision 3D models from 3D warehouse, click on the following link 3dwarehouse.sketchup.com
To get more information on this sketchup extension, send email to support@aluvision.com
Watch the following video tutorial for online demonstration.
This plugin is available in extension warehouse extensions.sketchup.com

~~~~~~~~~~~~~~~~~~~~~~~~~~
Published By
Rajib Dey
www.sketchup4architect.com
~~~~~~~~~~~~~~~~~~~~~~~~~~

A brighter future for one SketchUp classroom in Brazil

Previously in some areas of Campinas, Brazil, it was hard to find the experienced in software and technology but two Trimble colleagues in Brazil, Isabella Glacomin and Lais Tatagiba took an initiative to change this scenario. They launched a youth eclipse program that brings undeserved students with disclosure to SketchUp and also promoting a brighter future in this disadvantaged part of the country.

About the Youth Outreach Program: Trimble team in Brazil always took initiatives and activities for serving the community and giving it back some helping hands for better work. This year they thought to launch a youth outreach program with SketchUp and began their partnership with CEPROMM. CEPROMM is mainly a non-profitable association which helps and supports children, teenagers and women who live in an underserved area of Campinas known as Itatinga.

Campinas is located about 60 miles away from São Paulo and the area of Itatinga is known in Latin America for its uncontrolled usage of heavy drugs and have high prostitution rates. CEPROMM was founded in 1993 and dedicated to provide important resources to the underprivileged children and teens that are facing harmful situations at home. This association is currently aiding about 270 children, teenagers and their families by educational, personal and professional development programs and also organizes different mental health programs, arts and computer classes, sports and many more to enhance the good living skills in them. Trimble has connected with them for giving them some more different thing to live well in life.

Works around 3D modeling: Trimble with CEPROMM is going to the outreach project with SketchUp from Project Spectrum which will help the youth on the autism development in vocational skills and if this succeeds then a similar program will be held in Brazil also. The work has begun and CEPROMM is giving the students the access to coursework like computer classes that is not common in the traditional schools. The vocational tests given to the students help them to discover and operate possible career paths and it is hoped that it will be helpful for them. With this computer classes Trimble is willing to give the basic SketchUp lessons to make a way of working in 3D modeling or design in future.

The curriculum of the project: The program of giving the students a basic knowledge in SktechUp will help the students to become a basic or beginner user of SketchUp. The program is divided into three, two-hour long courses where they could take lessons step by step. In the first class, the students were given the knowledge of the basic tools and commands in SketchUp, then they learnt to draw simple lines, shapes there, work on changing the scale, moving the objects, also learnt to create groups and editing them properly.

In the second class, they created a 3D model using a 2D project and also learnt the process of creating windows and doors, it was a fun experience for them where they draw their imagination and gave them a beautiful shape. In the last class the learnt to create materials, textures on the walls and floors of their model house and also the method of importing the furniture from 3D Warehouse and customizing the things properly.

Ways of adding exposure to SketchUp: The students found a new world in SketchUp as they were never experienced this kind of technologies before in their school and at first they found some difficulty for them to grasp. Trimble helped them to grow their abilities of achieving something in future.

Creative models of Students: They have used their imagination and hidden wishes and created different models like house, swimming pool or garden etc.

Skills they learn: Though the students were taking SketchUp more excitingly and tried to create the models in a fast way but they soon understand that slowing down the work process will make the models better. Then they leant the things with ease and patience and put them in the models, this patience and eager to grab the knowledge will lead them to their beautiful future knowledge.

The future plans of the program: Both Trimble and CEPROMM ahs started to develop an action plan and decided some future plans for taking this program a new level. So they are willing to continue the lessons of SketchUp with the students and trying to give them the ability of mentoring other students under them so that the learning process can go further.

Article Source: blog.sketchup.com

A brighter future for one SketchUp classroom in Brazil

~~~~~~~~~~~~~~~~~~~~~~~~~~
Published By
Rajib Dey
www.sketchup4architect.com
~~~~~~~~~~~~~~~~~~~~~~~~~~

CleanUp3 and Solid Inspector2 in SketchUp

Introduced by Thomas Thomassen, both tools are important to erase the errors of your design. While CleanUp tools delete the unnecessary components and reduce the size of your design smartly, Solid Inspector checks the problems existed in your solid models. These tools are also useful to make your SketchUp design 3D print-ready. They easily erase the problems of your design without the intervention of your calculation and measurements. The content describes these tools in a brief way.


CleanUp3: The tool works best in reducing the heavy size of your SketchUp design in a logical way without making any visible change. Unnecessary and hidden elements generally put loads on the size of the model. The feature finds out these objects and cleans up smartly.
To open the tool:
Plugins > CleanUp
The benefits of using this extension:

• Eliminates unused items
• Deletes hidden geometry and duplicate faces
• Remove lonely edges and edge materials
• Merge identical materials
This extension is particularly being used for 3D printing for your SketchUp model. if your design contains an array of models and shapes, this tool deletes the hidden elements brilliantly to make the download of your model easier.

Solid Inspector2: Solid Inspector goes by its name and detects the problem areas of a group or a component that prohibit them being the solid manifold. This extension needs SketchUp 2014 or the newer version to run smoothly.
Application: Click the group or components to find out the holes and click fix button to solve the issues in a hassle-free way.
To Open the Extension:
Toolbar> Solid Inspector2

These tools perform well when it comes to detecting the underlying problems of your 3D design in SketchUp. They create an effortless platform for you where you can delete unnecessary objects to improve the style of your design.

To know how it performs, click extensions.sketchup.com

~~~~~~~~~~~~~~~~~~~~~~~~~~
Published By
Rajib Dey
www.sketchup4architect.com
~~~~~~~~~~~~~~~~~~~~~~~~~~

Wednesday, November 29, 2017

nz_Parabola – The newest sketchup extension

Natale Zappia has developed nz_Parabola, the newest sketchup extension. It is compatible with SketchUp 2016, SketchUp 2017, SketchUp 2018.


This sketchup is useful for Architecture, Construction, Education, Engineering, Gaming, Interior Design, Landscape Architecture and other sectors.
It is used to draw a parabola set with the base width and overall height.
Each Parabola is distinctively drawn on the basis of particular dimensions.
A Parabola is equivalent to Projectile Motion, from flightpaths to fountain spouts.
On-Screen Definition of Parameters
Height & Width is described on screen.
Settings
A Facet-Factor is applied to manage the number of facets which develop the parabola.
A value of <=1 is perfect, also the number of faces varies dynamically to accommodate the size of the parabola.
To learn the complete process, watch the following video tutorial.

This paid extension is available in extension warehouse extensions.sketchup.com

~~~~~~~~~~~~~~~~~~~~~~~~~~
Published By
Rajib Dey
www.sketchup4architect.com
~~~~~~~~~~~~~~~~~~~~~~~~~~


Design building: Leers Weinzapfel Associates

Leers Weinzapfel Associations is mainly a Boston-based award winning method which has specialized in architecture, urban and framework projects. They had worked on a tri-faculty building with an inventive timber structure for the University of Massachusetts. The principal of the associates, Tom Chung had given an interview to SketchUp team and this article is about that interview where reader can find a new method of designing for designers, effectiveness of association helped the project team for making a fascinating and continuous project.

About the project: The team got a project where they had to design a new home for three agencies which were connected with the design of the building environment that was spread across the University of Massachusetts Amherst campus. In the campus, the department of Architecture, department of Landscape Architecture & Regional Planning and the department of Building Construction had to bring together so that they could have the same type of teamwork, association and advance in their disciplines. The total building had to be smart and continuous and the boundaries should be pushed of geographical, construction and landscape design in a single budget as the project was state funded.

Problems in the project: The team also concerned about the previous street contexts and captured the basic views around the campus; they had expanded their site between two streets with various characters. Among the twp streets, first one was faced with the larger sized buildings of the campus and the second one had smaller structures located the historic part of the campus.

They tested many locations, forms and design ways in SketchUp and their Landscape Architect, Stephen Stimson Associates suggested that both the street could be conditioned with a coherent courtyard bundled in between. Both the streets had became a common focal point in the project as it had created a common space for the citizens and visitors of the building which was started from the landscape garden on the third floor and ends up on the ground floor to welcome the least of the campus.

They made this ‘commons’ space in an animated way with a dynamic 3D truss which was made with Glulam beams and metal tension rods. It was basically made as a support for the roof garden that had up to 18’ of soil and dense planting.

Reason of selecting timber in this project: Alexander Schreyer, chair of Building and Construction was the main enthusiast for using the timber structure in the project of the client. Alex had knowledge and interest on this matter and gave the team confidence for using timber in the project. They took help form some specialist timber structure engineers, Equilibrium Consulting and as a result they had arrived as the first group timber structure of its size and scale in the United States. In this timber made structure, the structural body was of glulam beams, the columns and the floor deck was the unique combination of Cross-Laminated Timber or CLT and concrete. The complex floor was combined of wood and concrete for creating delegate long spans which were stable, serviceable and wonderful for controlling vibration and auditory.

SketchUp in design process: According to the Leers Weinzapfel Associations, SketchUp is a very useful tool for them and could easily model things for having the skill and energetically works on projects. They had tested various absorptions and conceptions which vary on the location form the Google 3D map and plug in their design for the contextual fit. The walk-through feature also helped them to capture and demonstrate the quality of the main spaces. For changing the design they transferred it into the construction documents created in Revit. They also had focused on specific conditions in SketchUp before centralizing it into the final drawings and this method was become helpful for further long term deign processes.

Project’s point of continuity: A timber structure defined that it is a sustainably harvested renewable material with very low illustrated energy and carbon. The instant nature of the timber structure also decreases on-site labor demanding processes and accelerates the building process. Choosing the timber structures instead of steel and concrete also could leave a big impact on global carbon emissions and can make the world healthier. Besides the specification on the material, they also had a limited budget that prevented them from using costly bolt-on renewable strategies at the end of the work. But it is also true that the building consumed less energy from the beginning and they used a LEED Platinum rating and renewable energy sources due to their cost boundary in the project, so they used campus’ existing chiller system that was very helpful. They also planned spaces for fitting the mechanical heating and cooling services.

Role of collaboration in the project: In this low-budget project, collaboration played an important part which was very much necessary for the success of this project and the collaboration could be seen everywhere. The collaboration between the team and the clients showed by the three different UMass department heads, they also used their imagination in various way into the dimensional planning of the building ensured the chance encounters between the students and faculty in the departments increased. The sustainability consultant, Atelier Ten, MEP engineer, BVH Integrated Services were there with the team from the beginning and by handling massing, orientation and façade design they made an energy efficient building. Though their method was not familiar in the Boston Area of the United States they tried their best to make the project successful and they did it.

Article Source: blog.sketchup.com

Design building: Leers Weinzapfel Associates

~~~~~~~~~~~~~~~~~~~~~~~~~~
Published By
Rajib Dey
www.sketchup4architect.com
~~~~~~~~~~~~~~~~~~~~~~~~~~

How to Configure SketchUp for Your Design

SketchUp stays at the top place when it comes to the 3D modeling applications. Smartly and easily, SketchUp performs the tasks that need less knowledge and more imagination. But, complex 3D models are always hard to understand, and simplifying which needs your proficient skills. SketchUp also runs slow when it deals with a large model containing complex structures. The content discloses tricks and tips that help you sketch big designs easily in the software application. It has a certain set of rules that the designers must follow while designing. These rules are not mandatory though. They are the answer to how to use SketchUp in the best way.

This SketchUp tutorial includes a series of good habits that play an important role while designing a complex structure.
Configure your template:
Configuring a template is necessary that cuts down the time taken for designing complex things. It is always an advisable option to create your own template that contains all configured things for your use. To save the template, go to the File option and choose Save As. Add relevant information such as name and description of the template and click the Save button.

The saving process will differ as per the version and the operating system you use.

Choose your Unit: Things will go easier if you follow units of measurement for your designs. This allows you to use the models from SketchUp Warehouse without rescaling the object. It is the best option and sounds effective when you are using Warehouse for your model.
Steps to follow:
Window menu> Model Info> Units

Create layers:
The most-used layers must be saved for the future use as it gives you an instant access to the configuration of your need. With this, you can ignore the recreating of the same layer which is definitely time-consuming.

Window > Layers (click on the plus icon to add a new layer)

Delete unnecessary elements from your file:
Erasing unnecessary elements is an unspoken rule of any designing application. For SketchUp, you need to erase the default model and elements from the template before starting your work. you can also delete the default figure from the original template.

To automatically delete the unneeded details, click the Detail icon in layers, components, material and style and choose the purge option.

Keyboard short-cut for the most-used tool:
Knowing keyboard short-cut will help you increase your productivity while cutting down the time taken for your design. Remember the keyboard short-cut of the most-used tool that provides you with an easy access to the feature you are going to use, eliminating the need for clicks.

Other things that need to configure:
Configuring the needed application as per your preference will help you complete the work without repeating the same thing you have done before. This will be a needed step for designing a large and complex model. besides the above-mentioned tools, a few applications are still there that need to be configured.

• Scenes
• Rendering style
• Face and edge
• Font size used for text levels

The content is prepared from a popular book - Google SketchUp Workshop by Laurent Brixius.

How to Configure SketchUp for Your Design


~~~~~~~~~~~~~~~~~~~~~~~~~~
Published By
Rajib Dey
www.sketchup4architect.com
~~~~~~~~~~~~~~~~~~~~~~~~~~

Tuesday, November 28, 2017

FTC Solar introduced SunDAT v3 to simplify solar design in sketchup

FTC Solar Inc. comprising of a team of devoted renewable energy professionals, just unveils the next generation release of its proprietary SunDAT Solar Design Automation software solution.


SunDAT v3 renders extremely precise designs out of small residential systems to multi-hundred MW Single Axis tracker utility-scale projects.
With the addition of the new v3 user interface, the users can use an advanced feature to streamline the solar design process as well as generate various design iterations for comparison and appraisal. With energy modeling supported with NREL SAM, production estimates are tallied alongside for several layout options.
SunDAT v3 considerably accelerates the speed and accurateness of big scale solar design. All modeling is performed within the Sketchup 3D environment. Shading analysis conjoined with 3D terrain-following facilitates the users to analyze the effect of terrain on energy production.
“With advanced topography analysis, the users can get the ability to recognize the terrain over structural tolerances throughout the due diligence stage and have estimation of cut/fill volumes. By obtaining this feature in the initial design cycle land selection and cost estimation are improved radically.
SunDAT V3 automates the layout and drafting tasks and the engineers get the ability to optimize cost and constructability.
To download a 15-day free trial of SunDAT V3, go through the following link https://sundat.ftcsolar.com

~~~~~~~~~~~~~~~~~~~~~~~~~~
Published By
Rajib Dey
www.sketchup4architect.com
~~~~~~~~~~~~~~~~~~~~~~~~~~

How to Use SketchUp for Developing an Amazing Game environment

Till date, SketchUp has made a remarkable name as a simple and easy 3D designing tool. As the time goes, the software application pushes its boundary. Designers start using the 3D tool in fields other than known ones. SketchUp as a game environment developer is an added application that evolves gradually in the gaming industry. Professional developers love SketchUp as it offers a trouble-free way of designing complex models. The use of SketchUp in the gaming industry has already been started by Studio Olemingus – an independent game studio introduced by Dhruv, a designer and SketchUp artist, and Kevin, a programmer.

Get started with SketchUp

Dhruv, the small town boy from Chala in Gujarat, is the man behind this innovative thought of using SketchUp as a game developer. He learned SketchUp in 2009-10 as a part of his course. He goes deeper to know how to use the 3D tool in an innovative way like no other does. He used the tool for outlining a gallery for the first time and came to know that the file size generated by the application is less than the other software. The designing is rather simple to understand and to craft. The software application has become an inevitable part of his designing since then.

From outlining just a gallery to developing gaming environments, the journey was a learning one that sharpens his skills and makes him comfortable with the features and plugins. For Studio Olemingus, SketchUp is the main crafting tool that completes the base of the gaming environment flawlessly. The work, though, follows a few steps – developing meshes in SketchUp, painting them with textures designed in Photoshop, and finally compiling them in Unity.

The game ‘Somewhere’:

Somewhere – the game explores the mythical stories of India that enrich the country’s culture. It is an effort to bring back those strange folklores that faded away from the time. The stories are beautifully represented through Kayamgadh – the story teller of the game. The narrative-based game is new in its genre and brings a different perspective from the conventional ones. The game is an escape to the forgotten stories that revealed the India decades back.

The modeling tools that have been used for developing a gaming environment:

Scaling: Resize plays a very important role in this field, and scaling tool helps designers to modify the size that fits in the environment. Studio Olemingus has used its creativity and resized small objects to bring a new shape in its design. In this way, they turn tooth brush into trees and teacups into boulders in a landscape.

Repetition: Repetition modeling tool helps you create homogeneity in your design. The parts that do not need to identify as a single object can use repetition tool. Repetition tool is excessively used in developing a forest environment and a wall structure where homogeneity prevails.

Color and Textures: Though Studio Olemingus has used Unity for color and texture, it creatively used texture mapping with SketchUp Paint Bucket tool for prototyping objects with different colors and textures.

Follow Me Tool: Follow Me Tool works as a loft tool to develop a surface that stretches across the edge. The Studio uses this tool in two different ways – radial symmetry and symmetry across the loft axis.

Terrains: Generally, line, polygon, scale and move tools have been used t carve out the terrains in the design. Designing these is easier in SketchUp and takes less time than the other applications.

SketchUp Extensions: Studio Olemingus use ThomThom’s QuadFace Tools to modify the geometry with adding subdivisions and unsmooth faces. CLF Shape Bender by Chris Fullmer helped the team create leaves by cut out surfaces. Tree maker has been used for creating small plants and leaf components.

Studio Olemingus explores SketchUp in a new way like no other did before. The tools and features of the 3D modeling software application have the potential to design a complete gaming environment in an easy way.

To read more about the Studio and the game, visit blog.sketchup.com

How to Use SketchUp for Developing an Amazing Game environment

~~~~~~~~~~~~~~~~~~~~~~~~~~
Published By
Rajib Dey
www.sketchup4architect.com
~~~~~~~~~~~~~~~~~~~~~~~~~~

Architectural Design with SketchUp

Alex Schreyer, the author of the book “Architectural Design with SketchUp” has introduced it talked many things about it at SketchUp’s 3D Basecamp and he had authored some new SktechUp extensions. He also published a second edition of the book to shaping SketchUp in a new way. Updated editions from beginning to till last one can be found in the SketchUp’s site: SketchUpfor Design.com and this article is simply a review of the book.

About the book: As like SketchUp team, this book is also has the same motto: It’s for everyone. It is very useful for architectural design and also has aimed for all kind of designers. There are various topics in the book such as; applying and shaping textures, mastering components, extensions, rendering etc. all are very useful for everyone.

This book don’t have the aim to teach form the beginning but it has very important information for the SketchUp users. There is a chapter named ‘SketchUp Refresher’ for the beginners. The book has aimed for exploring principles of SketchUp which are not yet covered by any other books and have lots of experienced SketchUp modelers. The website ‘SketchUpfor Design.com’ is associated with the book and here people can get much resource for SketchUp tips, news and insight.

The book has divided into five main sections, they are, component-based modeling, extensions, rendering, making and Ruby scripting. Here are some details about the sections:

1. Component-based modeling: This section is a great part which consists the information of using various groups and components for building clusters of objects and pervades models with information. As per the author, he has a thought to model every element of a difficult construction like floor detail should be designed in the software before actually building it. In the digital model there is a chance to correct the mistakes and change some things for making it even better than before.

Though it is not a new technique for the SketchUp’s users but Alex gave it a new look by applying the concrete guidance to model the design in a better way with detailed information and objects. This modeling is technically very easy one but important as it explores the main things in the book briefly. This section also gives an idea about the broader category about information modeling. We all know that BIM can be used as per the need of the design but this section casts the idea at the most basic level and the book has the instructions of doing the work, utilizing it and also organizing the items. There is also information about dynamic attributes, organizing things with industry schemes and generating departs from the model.

2. Utilizing extensions: There are lots of extensions in SketchUp and identifying the extensions and their work is not an easy job. This book has a good collection of information about assembling the models in the alphabetical order with a brief description about them. There are also step-by-step tutorials suitable for workflows which can work between extensions.

3. Photo-realistic rendering: Renders don’t have many choices and it is a complicated thing, not a simple thing like clicking button and waiting for few hours. There are lot of things than this like the settings, presets, lighting environments and many other appliances which can go with making a halfway decent rendering and it need an improper amount of background knowledge, as it’s the mixture of science and craft both.

4. Making: The second edition has come with a new chapter called ‘Making Things with SketchUp’ which proves that the book is more than only the architectural field. In this section, some famous digital fabrication techniques like 3D printing, CNC, laser cutting and 2D printing etc. has surveyed by Alex and all of these has guided with a book for modeling advice, file prep, export considerations and pre-fabrication advice in working with other kind of programs. This long section has concluded with many pages and tutorial videos.

5. Scripting: This section looks little weird for the readers and users as reading and writing simple codes is a very simple thing and don’t need any special attention. But Alex has kept this section with the title of ‘Ruby for Designers’ here Alex has focused on the use of scripts for achieving forms which can become exhausting for the models in SketchUp. Using Ruby for writing codes is to increase the using power of algorithms in making stuff when there is no other way and Alex describes it with a tutorial step-by-step process with brief description.

Lastly it is an approach to the SketchUp lovers to go through this book without any confusion as it will enhance the SketchUp using skills as it the processes are clearly-written, briefly described and completed. In the website there are sample files, about 30 tutorial videos and a direct way to communicate with author.

Article Source: blog.sketchup.co

Architectural Design with SketchUp

~~~~~~~~~~~~~~~~~~~~~~~~~~
Published By
Rajib Dey
www.sketchup4architect.com
~~~~~~~~~~~~~~~~~~~~~~~~~~

Monday, November 27, 2017

E-on Software Announces the Availability of Release 4 of VUE 2016 and PlantFactory 2016 Software

Adds Stereo Rendering, VR180 Support, Multi-Polygonal and Crossed-Planes Leaves and Numerous User Experience Improvements
E-on software, a leading global developer of software for the creation, animation, rendering, and integration of natural 3D environments in the computer graphics, VFX, architecture, and gaming industries, today announced the immediate availability of Release 4 (R4) of its VUE and PlantFactory 2016 software.
The free versions of its VUE 2016 and PlantFactory 2016 R4 software (Personal Learning Editions and Trial versions) are also immediately available.
Key New Features in VUE 2016 R4
• Stereoscopic Rendering:
a. Available for both panoramic (360° and 180°) and non-panoramic renders
b. For Stills and Animations
c. User defined Interpupillary Distance and final image layout (top/bottom or left/right)
d. 3 convergence modes for handling parallax: Parallel, Converged and Off-axis
e. Automatically recognized by Stereo-compliant platforms (such as Youtube) and can be played on stereo compliant devices such as Occulus Rift, HTC
Vive, Nvidia 3DVision, Sony PSVR, Google DayDream, Google Carboard etc.
• 180 Degree VR Panoramas (VR180)
a. Render a 180° vertical and horizontal FOV
b. Automatically recognized by VR180-compliant platforms (such as Facebook and Youtube)
• Multi-pass Rendering Improvements
a. Optimized handling of semi-transparent materials to prevent background color to bleed within object mask color data
b. Embed alpha channel for each mask pass (when the output format supports it)
• Path Tracer renderer improvements:
a. Adds support for normal mapping
b. Selection of OpenCL devices: All Available Devices, GPU Devices Only, or CPU Devices Only
• UX/UI improvements
a. Added support for CPUs with more than 64 cores on Windows
b. Improved 4K/HiDPI display compatibility
c. Better responsiveness and faster computation of Procedural Terrain within the Terrain Editor
d. Alembic compatibility updated to version 1.7.3
• xStream Integration:
a. Adds support for Maya 2018 (MentalRay and VRay - incl. viewport 2.0)
b. Adds support for Cinema 4D R19.
Key New Features in PlantFactory 2016 R4
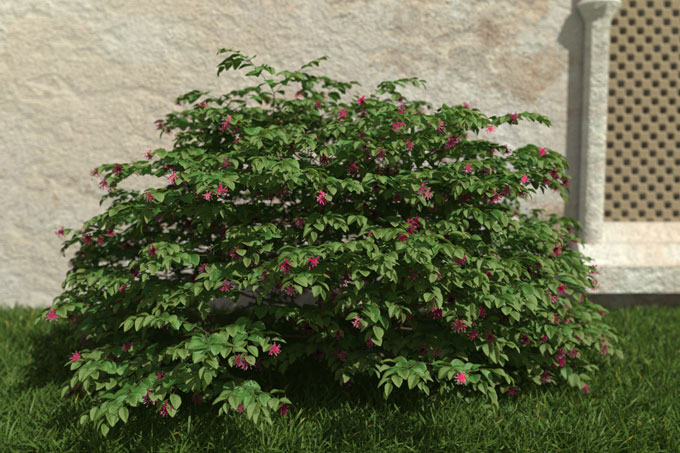
• Multi-Polygonal Single-Plane Leaves
a. Perfect for both offline rendering and light enough for real-time
b. Grid based mesh to add more realism in the vegetation finer details
c. Leaves can be bent, curved, folded and react to wind
d. Compatible with auto and user-defined LODs
e. Compatible with color shift, multi materials, two-sided materials etc…
• Crossed-Plane Leaves
a. Particularly suited for real-time engines, or low level LODs
b. Ideal for representing complex plant geometry parts such as flower groups or dense foliage
c. Very effective in terms of polygon count and memory footprint
d. Select either 2 or 3 crossed planes (2 vertical + 1 horizontal)
e. Fully customizable texturing
f. 4 Normal computation parameters for perfect integration
• Multi-pass Rendering Improvements
a. Optimized handling of semi-transparent materials to prevent background color to bleed within object mask color data
b. Embed alpha channel for each mask pass (when the output format supports it)
• UI/UX improvements:
a. Improved export
b. Improved sap inheritance
c. Added support for CPUs with more than 64 cores on Windows
d. Added wireframe display for billboards
e. Improved display of billboards back face
f. Enhanced image browsing
g. Improved hooking points placement for warpboards
Availability: Release 4 (R4) is available as a free software update for all registered users of VUE and PlantFactory 2016.
The 2016 R4 Personal Learning Editions (PLE) and Trial versions are also immediately available. Users can download the 2016 R4 Personal Learning Editions at no charge from www.e-onsoftware.com/try.
All VUE and PlantFactory 2016 software titles are available in English, French and German and perform under all versions of Windows 7, Windows 8, and Windows 10 (64 bit only), and Mac Intel (64 bit) for MacOSX 10.7+.
More information on VUE 2016 and PlantFactory 2016 is available at: e-onsoftware.com/vueand plantfactory-tech.com.
E-on Software Announces the Availability of Release 4 of VUE 2016 and PlantFactory 2016 Software
~~~~~~~~~~~~~~~~~~~~~~~~~~

Published By
Rajib Dey
www.sketchup4architect.com
~~~~~~~~~~~~~~~~~~~~~~~~~~

How to Make a Hole in a SketchUp Model

SketchUp seems to be the easiest platform in 3D designing with easy-to-learn tools and features. Still, users sometimes stumble with issues in their designing. Putting a hole in SketchUp model remains in the query list of designers always. Though many SketchUp forums discuss the topic with a great interest, designers feel blank why they fail to draw holes in their models. The content brings out some interesting ways with which one can simply solve the problems. The ways mentioned here are suggested by users themselves as no one can understand your problem better than them. Information singularly presented how to put a hole in a SketchUp model.

Tips required drawing a hole in SketchUp model:

• Push/pull tool is designed to perform the work we are talking about. You have to know how to use the tool to drill a hole into a model. To draw a hole in your design, you must select a shape of the hole and choose push/pull tool. Push the shape area until the pop-up menu shows On Face. If the hole is not enough deep, the model does not create the feature in question.

The picture above shows that it pushes the shape to the face of the design.

• You need to have a perfect square wall for this feature. If you do not have the same, the application will not work.
• The circle that you want to make a hole in must be attached with the model. You can simply follow the steps: Draw surface > Draw a circle on surface > delete circle inside > Push Pull the rest of the surface. One thing you must ensure that the circle must be attached to the surface. Otherwise, the push/pull function will not work. To create a hole in a solid model, you need to draw a circle > ensure the circle is attached to the surface > push pull to the back of the face.

To check the circle whether it is attached or not, you need to move the circle after it is drawn. If other geometries move along with the circle, then it is attached to the surface.

For video tutorial:

Drilling a hole correctly is not a completed thing of SketchUp. If your design follows the right measurements, you should not have to be worried about using any functions SketchUp is offering to you. The above-mentioned information is described for those who face the similar problems.

How to Make a Hole in a SketchUp Model


~~~~~~~~~~~~~~~~~~~~~~~~~~
Published By
Arka Roy
www.sketchup4architect.com
~~~~~~~~~~~~~~~~~~~~~~~~~~

SketchUp Plugins for Structure TrussFab Made of Plastic

Till date, different experiments and innovations have been made with SketchUp. But this one is indeed the creative one that opens up another perspective of the 3D modeling software. SketchUp has already been proven as an effective tool for designing real objects and its applications go far beyond your imagination. SketchUp has been used as the primary tool of designing TrussFab structure, which is new in concepts and ingenious in appeal.

TrussFab is the system of fabricating a large structure that is strong and tough enough to withstand the human weight. The process has designed a large-sale structure made of plastic bottles where bottles are used as beams instead of bricks. Node-links are used to keep this fabrication settled always, even in loads or pressure. The best thing is that it does not require sound knowledge in engineering and designing.

Phd researcher Robert Kovacs has recently created a large-structured trussFab using the plastic bottles. His team from Human Computer Interaction Lab from Hasso Plattner Institute in Potsdam, Germany has given a complete support to achieve this high. They made an end-to-end large-scale structure which is sturdy enough to stay unaffected.

The use of plastic bottles and 3D printing joints make the things even easier to construct for the team.

TrussFab uses plastic bottles to make rectangular trusses that are called the building blocks for designing a large scale TrussFab. SketchUp is offering TrussFab plugins that allow users to design the structure digitally prior to the construction. This plug-in also converts an existing structure into TrussFab one smartly without your intervention.

TrussFab SketchUp Editors has primitives that are used as building blocks for designing the model digitally. Generally, tetrahedron and octahedron shapes are available for designing trusses. Once the model is complete, the plug-in generates 3D model file for each node, which can be sent to the 3D printing.

With this SketchUp plugin, 3D printer and necessary materials, anyone can try their hands at designing TrussFab. This fabrication of large-scale structure made of waste materials gains popularity across the world. Designers also exhibit their creativity by making different models using the rule of TrussFab.

TrussFab presents an amazing application of SketchUp. Before this, the 3D modeling application has been famous for many creative projects like designing a playground with waste materials. The playground has become a successful venture in distant areas in the world and it earned appreciation from government and non-government organizations.

TrussFab is also gaining publicity as the nascent designers come up with plans to design big structure. SketchUp is the core platform where designers can test their skills virtually.

Article Source: www.archdaily.com

SketchUp Plugins for Structure TrussFab Made of Plastic

~~~~~~~~~~~~~~~~~~~~~~~~~~
Published By
Rajib Dey
www.sketchup4architect.com
~~~~~~~~~~~~~~~~~~~~~~~~~~


Friday, November 24, 2017

ShadeDat (Beta) – The newest sketchup plugin is available in extension warehouse

ShadeDat (Beta) is the newest sketchup plugin developed by the shadow factory.


The plugin performs shadow data visualizations for SketchUp. It visualizes the shadow range and daylight duration during the year or a specific day.
The plugin is compatible with SketchUp 2017, SketchUp 2018. The plugin can be utilized for various sectors like Architecture, Construction, Education, Engineering, Interior Design, Landscape Architecture, Urban Planning.
Features:
Shadow range analysis:
Take screenshots of the model at several times of the day or year, then combine them together
Average daylight duration:
Employs a gradient map image filter to the above shadow range image on the basis of average daylight duration, and apply a colour legend.
Hover over image to show average daylight duration.
To download the plugin, go to extension warehouse https://extensions.sketchup.com/en/content/shadedat
ShadeDat (Beta) – The newest sketchup plugin is available in extension warehouse

~~~~~~~~~~~~~~~~~~~~~~~~~~
Published By
Rajib Dey
www.sketchup4architect.com
~~~~~~~~~~~~~~~~~~~~~~~~~~